How to Repair and Fix Corrupt Registry in Windows 11/10
Are you facing issues with your Windows 11/10 operating system? Does it slow down or show errors frequently? The problem may lie in the registry of your computer. The registry is a vital component of the Windows operating system. It stores essential settings and information that help your system run smoothly. If it becomes corrupt or damaged, your computer may not function properly.
This article will discuss how to repair or fix a corrupt registry in Windows 11/10. This way, you can easily restore your original registry keys and values and ensure error-free performance.

Jump To
- Run the Disk Cleanup Tool
- Use Automatic Startup Repair
- Run the System File Checker
- Run the DISM Scan
- Import a Registry Backup
- Run CCleaner Registry Cleaner
- Scan Your System for Malware
- Use a System Restore Point
- Reset Your System
What is the Windows Registry?
The registry is a hierarchical database that contains settings, configurations, and options for Windows and installed software. It is responsible for keeping track of hardware, software, and user preferences.
The registry is organized into five main sections or "hives": HKEY_CLASSES_ROOT, HKEY_CURRENT_USER, HKEY_LOCAL_MACHINE, HKEY_USERS, and HKEY_CURRENT_CONFIG. Each hive contains numerous keys, values, and data entries that are used to configure the operating system and installed software.
By making changes in the Windows Registry, you can customize your system on a new, deeper level. This means you can add or remove certain features, control user access rights, tweak software settings, and so on.
Signs of Registry Issues
A corrupt or damaged registry can cause various problems with your Windows 11/10 operating system. Some of the common signs of registry issues include:
- Slow startup and shutdown times
- Frequent crashes or freezes
- Blue screen errors
- Applications not responding or crashing
- Missing or broken shortcuts
- Strange error messages
If you experience any of these issues, it may be time to repair or fix your registry.
What Causes Broken Registry in Windows?
There are various reasons why registry items can become broken:
- Virus and malware: One of the most common causes of broken registry items is malware infestation, which can corrupt multiple keys and values in the registry, thereby impacting the functioning of settings that rely on them.
- Fragmentation: The registry can become fragmented over time, especially after installing or updating software and services. This fragmentation can lead to certain registry items becoming broken.
- Modifying the Registry: Making improper changes to the registry through the Registry Editor can cause registry items to break. This is especially true when the user lacks sufficient knowledge or information about the changes being made.
- Build-up of items: Over time, the registry can accumulate corrupted, unnecessary, empty, or misplaced items. This can harm functional registry items and slow down and damage the system.
While these are only some of the problems that may lead to broken registry items, they are the most common ones. Being aware of them can help you take preventive measures to ensure the smooth functioning of your operating system.
How to Repair and Fix Corrupt Registry in Windows 11/10?
You can use several methods to repair or fix corrupt registry in Windows 11/10. Here are some of the most effective methods:
1. Run the Disk Cleanup Tool
One of the reasons for a corrupt registry in Windows 11/10 can be due to accumulated junk files, temporary files, and system files. Running the Disk Cleanup Tool can help clean up the system and free up some space on your computer, which could potentially fix registry issues.
- Open the Windows search utility from your taskbar, or use the Windows + S keyboard shortcut. Type in “Disk Cleanup” and open the application from the search results.

- Select the “C:” drive in the drop-down menu and press OK.

- Click on the "Clean up system files" button. Note that you need an administrator account to carry out these actions.

- Keep the drive selection “C:” and click the OK button to relaunch the Disk Cleanup tool. Wait for the application to scan your system.
- Click OK again, then click the “Delete files” button to remove any unnecessary files from your system. This will also fix any unneeded items in your registry.

2. Use Automatic Startup Repair
Then Automatic Startup Repair can help diagnose and repair registry issues that may be affecting your system. Here's how to use it.
- Open your Start menu and select "Settings" from the available tools. Alternatively, you can open the applet using the Windows + I keyboard shortcut.
- Select "System" first, then scroll down until you see "Recovery," and click on it once. You'll be redirected to a new page.

- Scroll down until you see the Recovery options section. Click "Restart now" next to the "Advanced startup" tool here.

- If you do everything correctly, your computer will boot into the Windows Recovery Environment (WinRE). Here, use your mouse or keyboard to navigate to Troubleshoot > Advanced options > Startup Repair.

Your computer should restart itself automatically and run the necessary tools to fix your registry. Check out how to fix the "Automatic Startup Repair couldn’t repair your PC" error if you run into it.
3. Run the System File Checker
The System File Checker is a built-in Windows utility that can scan and repair corrupted system files, including those that may be causing issues with the registry. Running this tool can help restore system stability and fix any issues that may be impacting the registry.
- Open the search bar in your taskbar by clicking the magnifying glass icon. Press Windows + S on your keyboard as a shortcut.
- Type “Command Prompt” in the search box and choose Run as Administrator. When prompted by the User Account Control (UAC), click Yes to allow the app to launch with administrative permissions.

- When the Command Prompt interface shows on the screen, input the following command and press the Enter key on your keyboard: sfc /scannow

- Wait for the scan to complete.
4. Run the DISM Scan
DISM (Deployment Image Servicing and Management) is another built-in Windows utility that can help repair system files related to the registry. Running a DISM scan can help fix any issues that may be causing your registry to become corrupted.
- Open the search bar in your taskbar by clicking the magnifying glass icon. Press Windows + S on your keyboard as a shortcut.
- Type “Command Prompt” in the search box and choose Run as Administrator. When prompted by the User Account Control (UAC), click Yes to allow the app to launch with administrative permissions.
- When the Command Prompt interface shows on the screen, input the following command and press the Enter key on your keyboard: DISM.exe /Online /Cleanup-image /Restorehealth

- Wait for the scan to complete.
5. Import a Registry Backup
If you have a registry backup saved from when your system was working correctly, importing it can fix any issues you may be experiencing with your current registry. This option is only recommended if you have a recent registry backup.
- Press your keyboard's Windows + R keys to bring up the Run utility. Here, type in "regedit" without quotes and press the OK button. Doing so will launch the Registry Editor.

- Click on File > Import using the Registry Editor's toolbar menu.

- Browse your computer for the backup file. It should be a file with the "Registration Files (.reg)" file type. Select it and click "Open."

- Wait for the Registry Editor to import the backup file, then reboot your system.
6. Run CCleaner Registry Cleaner
CCleaner is a popular third-party software tool that can clean up junk files, optimize system performance, and fix registry issues. Running the CCleaner Registry Cleaner can help repair any corrupted or broken entries in the registry.
- Visit the official website of CCleaner and download the latest software version. Once the download is complete, double-click on the setup file and follow the on-screen instructions to install it.
- Once the installation is complete, launch the program, and select the "Registry" tab from the left-hand side of the window. Click the "Scan for Issues" button to initiate a scan of your registry. This process will search for invalid entries or keys associated with uninstalled programs.

- After the scan is complete, the program will display the results in the main window. Review the list of entries CCleaner found and decide which ones you want to fix.
- Click on the "Review selected Issues" button to fix the issues found during the scan. Before proceeding with any changes, it's recommended to back up your registry. Click “Yes” to allow the app to create a backup before making any changes.
- CCleaner will prompt you to confirm the changes before proceeding. Click "Fix All Selected Issues" to confirm the changes and allow CCleaner to delete the invalid registry entries.

- Repeat the scan and fix process until CCleaner no longer finds any issues. This process may take some time, depending on the size of your registry and the number of issues found.
7. Scan Your System for Malware
Malware infections can also cause registry issues, impacting system stability and performance. Running a full system scan with reputable anti-virus software can help identify and remove any malware causing issues with the registry.
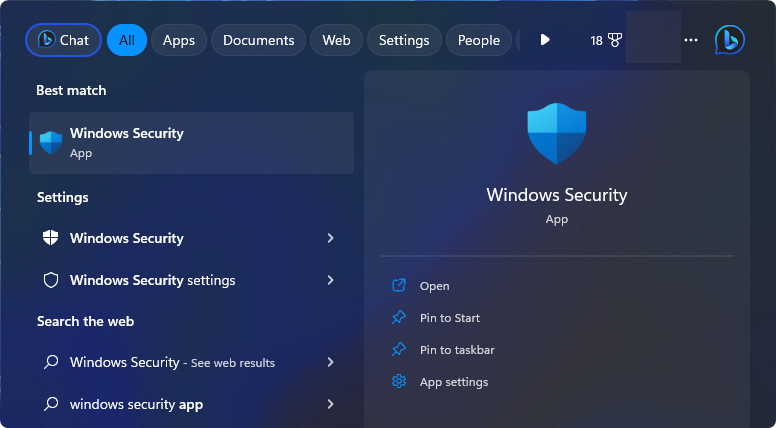
- Bring up the Search feature from your taskbar or by pressing the Windows + S keyboard shortcut, and type in “Windows Security.” Launch the app from the search results.
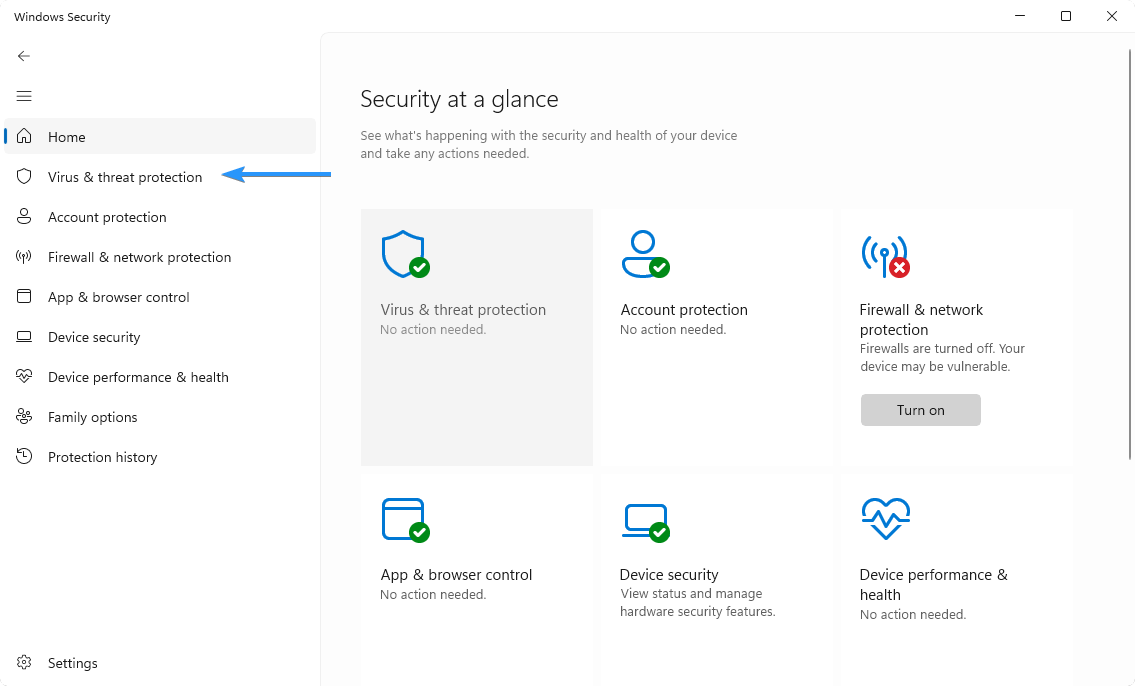
- Click on “Virus & threat protection” from the available options.
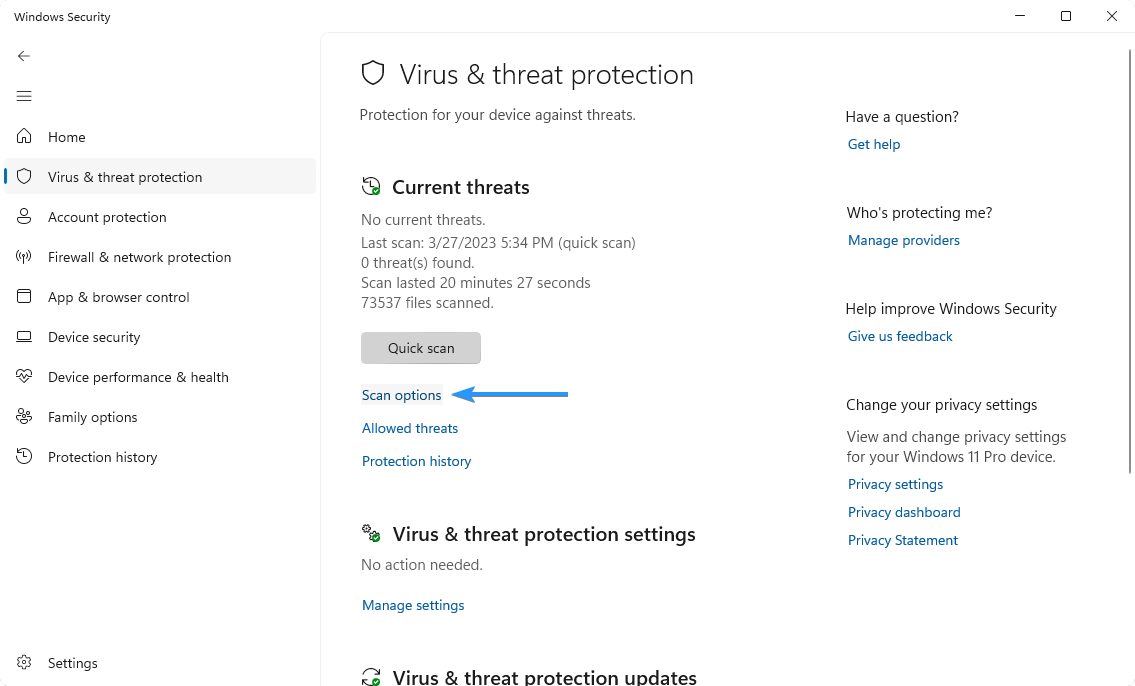
- You’ll find your scan options under the “Current threats” header. Before beginning a system scan, click the “Scan options” link.
- First, select the “Full scan” option. This is going to check all files and apps on your hard disk. Next, click the “Scan now” button to get started.

- It’s important to note that this scan may take longer than an hour based on how many files you have stored on the drive. If the scan detects any anomalies and malicious files, it’ll immediately quarantine and disable them.
While third-party apps are convenient, most of them aren't free. However, here at SoftwareKeep, you can get reliable antivirus software at an affordable price. With our premium antivirus solutions, you can rest assured that your system is secure from malicious threats.
8. Use a System Restore Point
If you have a system restore point saved from a time when your system was working correctly, then restoring your system to that point can potentially fix any issues you may be experiencing with your registry. This option is only recommended if you have a recent restore point saved.
- Open the search bar in your taskbar by clicking the magnifying glass icon. Press Windows + S on your keyboard as a shortcut.
- Search for “System Restore” and open the “Recovery” applet from the search results.

- Click on the “Open System Restore” link from the available options.

- Select a restore point you want to return to. Make sure that the restore point was created at a time when your system was functioning properly! You can select an automatic or manual backup if you have multiple. Click Next after choosing one.

- Review the restore point information and click the “Finish” button to restore your system. Make sure to check for affected programs!

9. Reset Your System
If all else fails, resetting your system can help fix any issues you may be experiencing with the registry. This option will wipe all your data and restore your system to its original state, so it should only be used as a last resort.
- To access the Settings menu, you can either click on the Windows icon located at the bottom-left side of the screen and choose Settings from the Start menu or use the keyboard shortcut Windows + I.
- Navigate to System > Recovery > Reset this PC. Click on the “Reset PC” button to begin the process.

- Choose the suitable option. Select "Keep my files" to keep your personal files or "Remove everything" to perform a clean install of Windows. Note that you may need to reinstall some applications in both cases.

- After making your choice, follow any further on-screen instructions to reset your operating system. Windows will install all the necessary system files, and your computer will reboot with your new, refreshed Windows.
You can also reinstall Windows using bootable media or even reinstall Windows from the cloud.
Conclusion
The Windows Registry is an essential part of the Windows 11/10 operating system. A corrupt registry can cause system instability and performance issues, which is why it’s essential to recognize and fix any issues that may be present. The above methods can help repair or fix corrupt registry items in Windows 11/10. If you're unsure about making changes to the registry, it’s best to contact a professional for assistance.
We hope this article was helpful in explaining how to repair and fix corrupt registry items in Windows 11/10. Good luck!
One More Thing
We’re glad you’ve read this article. :) Thank you for reading.
If you have a second, please share this article on your socials; someone else may benefit too.
Subscribe to our newsletter and be the first to read our future articles, reviews, and blog post right from your inbox. We also offer deals, promotions, and updates on our products and share them via email. You won’t miss one.
Related Articles
» How to disable network access to the Windows Registry on Windows 7
» How To Remove the Activate Windows 10 Watermark
» How to Restore Your Previous Version of Windows