How to Recover Unsaved Word Document - Applies to deleted word document
Accidentally exiting Microsoft Word, experiencing an application crash, or having your computer run into an unexpected error may cause a Word document you’re working on to disappear unsaved. You'll need to take steps to recover unsaved Word document.
This often leads to a loss of data, time, and effort. Fortunately, there are a few ways to attempt to recover an unsaved Word document.
Don’t give up just yet! You might be able to bring your work back onto your computer in one piece.
This article goes into the details of all the possible ways how you can recover unsaved Word document that you forgot to save, or lost because of an unpredictable error. Let’s get started right away.
Recovering Unsaved Word Document
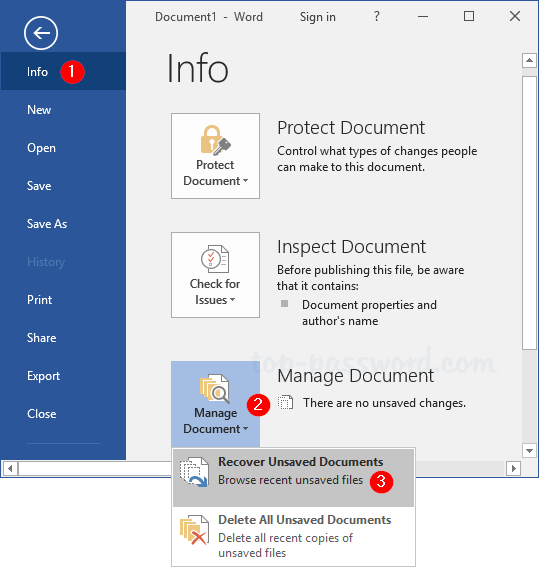
- In MS Word, click the File Tab in the upper left.
- Click Manage Document and select Recover Unsaved Documents from the drop-down list.
- Check for your missing file in the dialog box.
- Open the recovered Word document and click the Save As button in the top banner.
Please note that the various sections and instructions in this article apply to Word 2019, Word 2016, Word 2013, Word 2010, Word for Mac, and Word for Office 365.
If you’re working with other versions of Word, such as Word Online or Word 2007, there’s no known way to recover a document that wasn’t saved.
How to recover unsaved Word document: Pre-Recovery
Temporary files may allow you to recover an unsaved Word document. Multiple recovery methods exist, but no one method is guaranteed to work in every situation. You can enable auto-saving in Microsoft Word's settings to prevent losing your work.
Here are 7 ways to recover unsaved work documents:
1. Search for Word documents to recover unsaved Word documents
Try searching for the Word document in Windows to recover the unsaved document:
- Select Start, type the document name (in Windows 8.1, type the name in the Search box), and then press Enter.
- If the Documents list (or Files list in Windows 8.1) contains the document, double-click the document to open it in Word.
If the search results don't contain the file, go to the next method.
2. Searching for Word backup files to recover deleted Word document
All Word backup file names have a ".wbk" extension. If you have the "backup copy" option selected in Word, there might be a backup copy of the file on your PC.
If you want to check whether this option is on, select File > Options > Advanced, then scroll down to the Save section, and select Always create backup copy.
If you're using Microsoft 365 subscription, you can check these two folder locations for the backup file:
- C:\Users\AppData\Roaming\Microsoft\Word
- C:\Users\AppData\Local\Microsoft\Office\UnsavedFiles
Note: In these paths, replace <UserName> with your username.
To find your Word document's backup copy, select Start > enter .wbk in the Search box > then press Enter. If there are any files with the name "Backup of" followed by the name of the missing file, that's your file. Just double-click the file name to open it.
If you still don’t find a backup file for the document, go to the next method.
3. Use the Recover Unsaved Documents function in Word
Microsoft has added an option that may potentially save your unsaved documents from permanent deletion. This can be accessed in Word itself by following the steps outlined below.
- Open Microsoft Word and navigate to the File menu using the header interface on top of your window.
- Click on the Manage Document button to extend its options, then choose Recover Unsaved Documents from the drop-down menu. This will open up a separate window where you can see a list of unsaved documents Word is aware of.
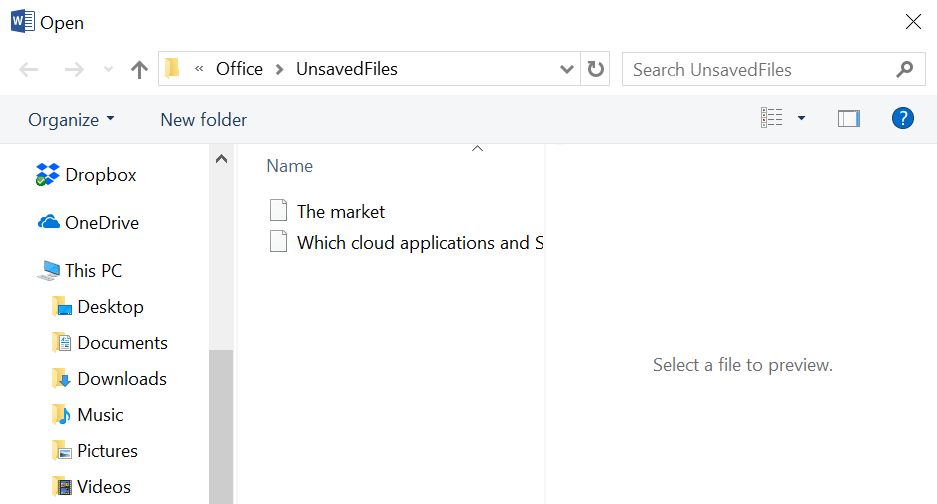
- Select the unsaved file you want to recover from the displayed list, then click the Open button.
- Your file will open in Word, where you can proceed to save it using either the File menu or the Ctrl + S keyboard shortcut.


4. Recover unsaved Word document from your temporary files manually
Windows keeps hundreds of temporary files on your computer for various optimization reasons. If you don’t want to use the recovery option directly from Word, you can manually find a copy of your unsaved Word document here, which you can move and save manually in order to restore it.
- Open your File Explorer and navigate to the following folder:
C:\Users\User\AppData\Local\Microsoft\Office\UnsavedFiles
Make sure to replace User with your local Windows username, or else the path will be incorrect. You can also paste this string into the Run application (opened by pressing the Windows + R keys at the same time.) - Similarly to the first method, you’ll see all of the files Word has automatically saved for you. Select all the files you want to recover.
- Right-click on one of the selected files and click the Copy option from the context menu. You can also use the Ctrl + C keyboard shortcut.
- Navigate to the location where you want to keep your restored files. Right-click anywhere inside the folder, then press the Paste option. You may also use the Ctrl + V keyboard shortcut.
- Wait for your files to finish copying. Voila! You’ve successfully restored your unsaved documents to a safe place. You can simply open them and work with them again without having to fear that they’ll be deleted.
5. Restore deleted Word documents from the Recycle Bin
If you accidentally deleted a document, it’s possible to restore it from the Recycle Bin on your desktop if it hasn’t been emptied yet. The steps below guide you through checking whether your document is in the Bin, and how you can restore the document if it is.
- Navigate to your desktop and check if your Recycle Bin has any contents by double-clicking on it. A new window will open up, displaying everything currently in your bin.
- If you see contents, locate your accidentally deleted Word document and select it.
Pro-tip, the Recycle Bin has a search feature that allows you to locate files way easier. - Select your Word document and keep holding the mouse button. Drag and drop the file onto your Desktop (or any other folder that isn’t the Recycle Bin.)
- You’ve successfully restored your unsaved documents to a safe place. You can simply open them from the new location and work with them again without having to fear that they’ll be deleted.
6. Prevent future losses with AutoSave and AutoRecover
Two extremely useful features work together in Word to ensure you never run into problems with unsaved or lost documents. This section describes how you can turn these features on to ensure you never come across an issue like this in the future, even if you experience similar unexpected errors.
AutoSave
AutoSave works when Office 365 subscribers choose to save their documents to OneDrive or SharePoint. It automatically saves your document as you work on it, without you ever having to worry about manually saving all the time. This feature drastically decreases the chances of data loss and is highly recommended for people who work with Word on a daily basis.
As mentioned above, this is a feature exclusive to Office 365 subscribers. If you wish to work with AutoSave enabled, look into how you can become a subscriber by visiting Microsoft’s official website.
AutoRecover deleted Word document
For non-subscribers, there’s a feature that may save you from future loss of data if used correctly. Here’s how you can turn it on when working on a Windows operating system:
- Go to the File tab, then select the Options menu from the pane on the left side. A new window will appear, listing the many settings of Word.
- Switch to the Save tab in the left pane.
- Select the Save AutoRecover Information Every X Minutes checkbox, then manually enter the number of minutes you want in between each saves. Many people recommend inputting somewhere between 5 and 10 minutes.
- Make sure that the Keep the Last AutoRecovered Version if I Close Without Saving option is selected. This is what will make it possible to recover files in the future even if Word or your computer encounters a sudden error.
- Click the OK button to finalize the change. You now have AutoRecover turned on for the future!
7. Recover an unsaved Word document on Mac
On macOS versions of Word, the process of restoring files including unsaved Word documents is slightly different.
Unlike some Windows versions, the AutoRecover feature is turned on by default for Mac users. This makes the process slightly different, but more efficient as you don’t have to worry about losing unsaved files at all unless the feature was manually turned off previously.
To recover deleted Word document in Mac:
- Open the Finder window on your Mac, then:
- Type in “AutoRecovery” in the search bar and hit the enter key. Doing this will search your device for the default Word AutoRecovery folder.
- Alternatively, click the Go option from the header and select Go to folder (shift + ⌘ + G) Paste in the following path and hit enter: Library/Containers/com.microsoft.Word/Data/Library/Preferences/AutoRecovery.
- You’ll see all of the files Word has automatically saved for you. Select all the files you want to recover.
- Right-click on one of the selected files and click the Copy option from the context menu. You can also use the ⌘ + C keyboard shortcut.
- Navigate to the location where you want to keep your restored files. Right-click anywhere inside the folder, then press the Paste option. You may also use the ⌘ + V keyboard shortcut.
- Wait for your files to finish copying. Voila! You’ve successfully restored your unsaved documents to a safe place. You can simply open them and work with them again without having to fear that they’ll be deleted.

Final Thoughts
That's it. We've highlighted 7 ways to recover unsaved Word documents. We hope that this article was useful in teaching you how to recover an unsaved Word document on various platforms.
If you ever run into issues with your Word documents getting lost, feel free to return to our article in the future.
You can also check our cheat sheet for MS Word here. Check out our help center for many other tips and tricks about Microsoft Word documents.
Further Reading
> How to Unfreeze Word on Mac Without Losing Work
> 9 Ways to Fix Windows 10 Won't Shut Down
> Fixed: Print Spooler Keeps Stopping on Windows 10
About the Author