How To Fix the “Webpage Not Available” Error in Your Browser
In this guide, you'll learn how to fix the "Webpage not available" error on your browser. These solutions are for Chrome, Edge, and Firefox.
Do you keep getting the "Webpage not available" error message when browsing the internet? Don't worry, you're not alone.
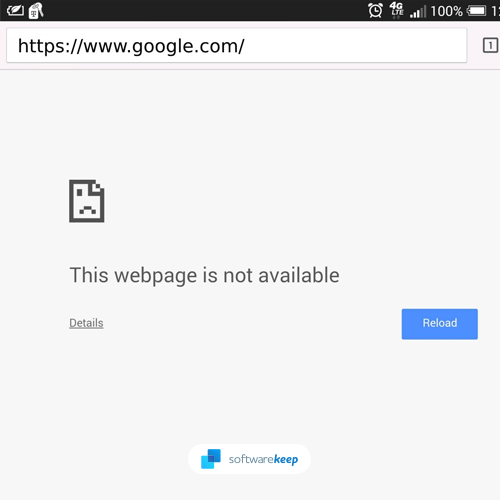
The “This webpage is not accessible” error is one of the most annoying problems that many web users see. When it happens, you will be unable to access the requested website and many other websites, depending on the cause. Because the error is vague, you might not know why it’s even happening on your computer.
Luckily, this is a common problem that many people experience. Because of this, it’s incredibly easy to fix if you know where to start. In this article, we'll show you how to solve this issue in popular browsers such as Google Chrome and Microsoft Edge. We'll also touch on possible causes and how to prevent it from happening again in the future.
What causes the “This webpage is not available” error?
This error can occur for a variety of reasons, including incorrectly inputting a website URL, invalid cookies in your browser, DNS server difficulties, or using a defunct proxy. So, before troubleshooting your computer or web browser, review the possible causes, such as the ones listed below.
- A problem with your router.
- Your Internet Service Provider (ISP) is down or having issues.
- Common Wi-Fi hotspot errors.
- Invalid DNS server settings or faulty proxy.
- Windows Firewall is blocking your connection.
- An issue with the website you’re trying to access.
If you can't open the requested page on another computer or device, it's because the website you wish to visit is temporarily or permanently unavailable. There is nothing you can do in this circumstance until the site is restored. However, if the website can be loaded from a different device, the problem is most likely with your machine.
Solved: This webpage is not available in Google Chrome, Edge, and Firefox
If you've ruled out all other possibilities, the source of this error must be your browser or machine. Here are several fast web page tests and fixes for the "This webpage is not available" issue on various web browsers.
Method 1. Make sure the website URL is correct
You may want to check and find expired domains, but it's possible that you typed the URL incorrectly while attempting to reach a website. Make sure the URL is accurate before proceeding. For instance, instead of entering "google.com," you may have typed "gogle.com" with one of the letters missing. You'll get the "Webpage not accessible" error if the mistyped domain isn't in use in this instance.
If you’re unsure of what the website address is, we recommend looking it up in a search engine. For example, if you search for “SoftwareKeep”, you’ll be able to see our accurate URL from the search results. Note that many websites are also accessible from different domains.
Method 2. Power cycle your computer and router
Many problems with online connectivity can be resolved by just restarting your computer and network. This is something we recommend doing before moving on to the techniques below. To begin, restart your Windows computer and router by following these instructions.
- Click on the Windows icon in the bottom-left of your screen to bring up the Start menu.
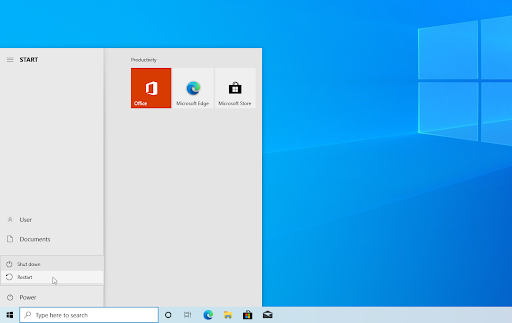
- Click on the Power option, and then choose Restart. This is going to close all of your open applications and completely restart your computer.
If that didn’t work, restarting your router might do the trick. There's no reason not to try it out since all you need for this is three easy steps, described below:
- Locate the power button on your router and turn the device off.
- Wait for a few minutes. We recommend waiting anywhere between three to five minutes to allow your router and network to properly shut down.
- Turn your router back on.
If you're still dealing with the “This webpage is not available” after restarting your computer and router, continue reading. We'll help you try some other fixes below!
Method 3. Clear your browser data
Clearing your browsing data will offer your DNS settings a clean slate. This reduces the chances of the “Webpage not available” error being caused by defective or outdated DNS requests. Simply follow the steps below for your preferred web browser.
How to clear browsing data in Google Chrome
If you use Google Chrome for browsing, follow the steps below to clear your browsing data.
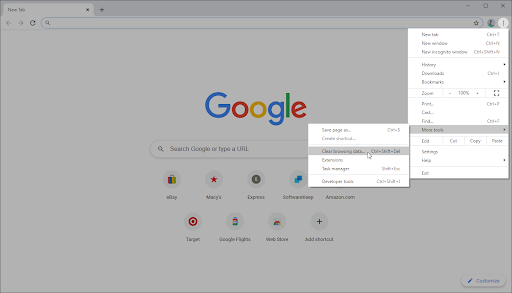
- Click on the More icon (the three dots placed vertically next to your Chrome user icon), and then hover over More tools. Select Clear browsing data from the drop-down menu.
- Make sure the time range is set to All time.
- Enable all of the following options:
- Browsing history
- Cookies and other site data
- Cached images and files
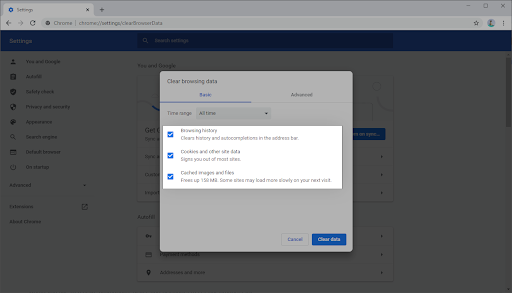
- Click on the Clear data button. After the process is over, restart Google Chrome and check if this helped you resolve the problem.
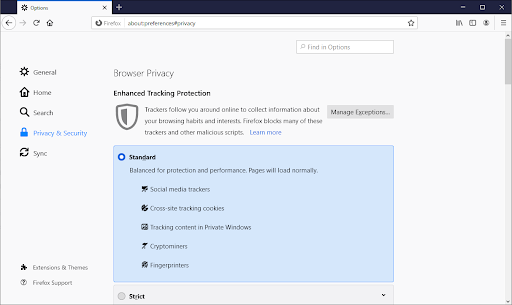
How to clear browsing data in Firefox
If you use Mozilla Firefox for browsing, follow the steps below to clear your browsing data.
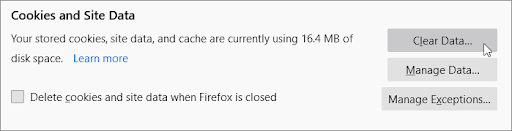
- Type about:preferences#privacy into the address bar and press the Enter key on your keyboard. You’ll be redirected to Firefox’s settings page.
- Scroll down to the Cookies and Site Data section. Here, click on the Clear Data button.
- Select both Cookies and Site Data and Cached Web Content, and then click on the Clear button to proceed. Wait for Firefox to process your request and delete the data.
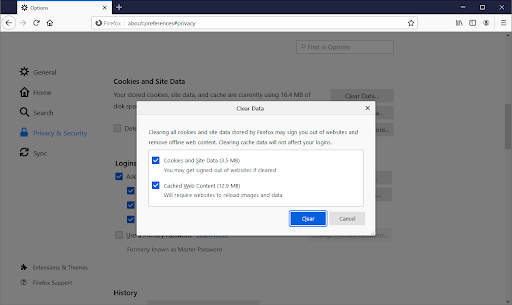
- Restart your browser after the task has concluded. You can try accessing the website that previously gave you the webpage error.
How to clear browsing data in Microsoft Edge
If you use Microsoft Edge for browsing, follow the steps below to clear your browsing data.
- Click on the Edge menu button in the top-right corner of the browser, and then click on Settings from the available options.
- Switch to the Privacy, search, and services tab using the pane on the left side. Here, scroll down until you see the Choose what to clear button, and then click on it.
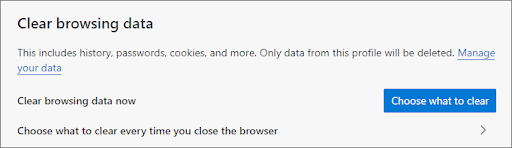
- Make sure to set the time range to All time.
- Select Browsing history, Download history, Cookies, and other site data, and Cached images and files then press the Clear now button. Wait for the process to finish, and then check if the same error occurs when you browse with Edge.
Method 4. Flush DNS
You might try manually deleting the DNS cache on your device to see if the issues it causes go away. It simply takes a few minutes to complete the operation, which only requires the usage of the Command Prompt.
- Open the search bar in your taskbar by clicking on the magnifying glass icon. You can also bring it up with the Windows + S keyboard shortcut.
- Type Command Prompt in the search box. When you see it in the results, right-click on it and choose Run as Administrator. If you're using a local account that doesn't have administrator permissions, click here first.
- When prompted by the User Account Control (UAC), click Yes to allow the app to launch with administrative permissions.
- Input the commands below in the following order, pressing the Enter key on your keyboard after each line:
- ipconfig /flushdns
- ipconfig /registerdns
- ipconfig /renew
- ipconfig /release
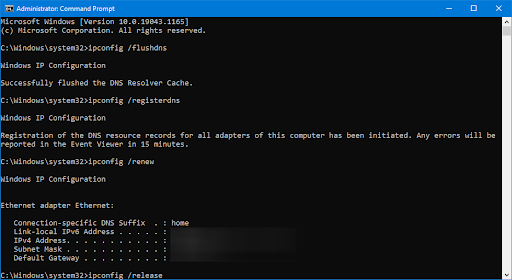
- Close the Command Prompt and open any web browser. Check if you’re able to access a website without running into the website error.
Method 5. Run the Network troubleshooter
Many built-in troubleshooters are included with Windows. These apps are designed to help you find and fix particular issues with your laptop. The network troubleshooter can discover any system issues or misconfigurations that may be causing this error.
- Click on the Windows icon in the bottom left of your screen to bring up the Start menu. Choose Settings, or alternatively use the Windows + I shortcut.
- Click on the Update & Security tile. This is where you can find most of your built-in troubleshooters.
- Switch to the Troubleshoot tab using the left-side pane. Here, you should be able to see a troubleshooter named Network Adapter.
- If you don’t share full diagnostic data to Microsoft, click on the Additional troubleshooters link and locate the Network Adapter troubleshooter there.
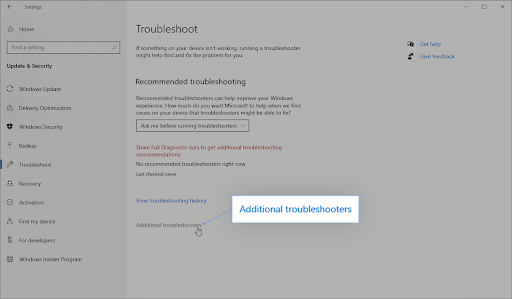
- Click on the Run the troubleshooter button. Wait for the troubleshooter to scan your device and identify any issues.
Remember that this troubleshooter isn't flawless, which is why we recommend saving it for last. It may not discover any problems, but it doesn't rule out the possibility that one of our other methods may restore network functioning.
Method 6. Change to a different DNS server
If your problem is caused by a network problem, you may need to change your DNS address. There are a number of public DNS services from which to pick. Alternatively, you can switch your device to automatically obtain the information you want. Here's how to go to the DNS settings on Windows.
- Press Ctrl + X on your keyboard, and then click on Network Connections from the context menu.
- Select your current connection type (for example “Wi-Fi” or “Ethernet”) in the left pane, and then click on Change adapter options on the right pane.
- Right-click on the connection you’re currently using and select Properties.
- Scroll down until you see the Internet Protocol Version 4 (TCP/IPv4) option. If there’s no checkmark next to it, click on the box once to enable it. Afterwards, click on the Properties button to open a popup window.
- Select Use the following DNS Server addresses. Now, you have some choices for what DNS server you want to use:
- Type 1.1.1.1 into the first row, then 1.0.0.1 into the second row. This will change your DNS to the popular 1.1.1.1 server, which you can read more about by clicking here.
- Alternatively, use Google’s DNS server by typing in 8.8.8.8 as Preferred DNS server and 8.8.4.4 as Alternate DNS server.
- You can also use OpenDNS if you type in 208.67.222.123 and 208.67.220.123 instead.
Select the Validate settings upon exit option if you don’t want to restart your computer — otherwise, and then click OK and reboot. See if the changes have helped you access the website that was giving you problems previously.
Method 7. Disable proxy server
You might be using a proxy server for your LAN. In this case, we recommend turning the feature off to test whether or not the issue was caused by the configuration.
- Open the search bar in your taskbar by clicking on the magnifying glass icon. You can also bring it up with the Windows + S keyboard shortcut.
- Type in Internet Options and click on the first search result. Switch to the Connections tab once the pop-up window shows up, and then click on LAN Settings.
- Once in the Local Area Network (LAN) Settings window, make sure that the Use a proxy server for your LAN option is NOT turned on. If the option is ticked, your issue may be related to the proxy server, so make sure to turn it off.
- Click OK. Check if the error reappears after disabling this feature in Windows.
Final thoughts
We hope this article has helped you fix the “Webpage not available” error message. If it hasn't, please let us know and we'll do our best to help! Be sure to keep an eye out for more of our helpful articles on technology troubleshooting, mobile device news, or general tech tips in the future.
If there are any questions left unanswered or problems not addressed, please feel free to reach out — our team of experts would love to help! In the meantime be sure to keep up with all things tech by checking back for more articles about troubleshooting, and following us on social media.
Follow our Blog for more great articles like this one! In addition, you can check our Help Center for a wealth of information on how to troubleshoot various issues.
One more thing
Sign up for our newsletter and get early access to our blog posts, promotions, and discount codes. Thank you for reading! We hope to see you again soon.
Recommended articles
» How To Fix the “Can’t Connect Securely to This Page” Error in Microsoft Edge
» How to Fix "ERR_NAME_NOT_RESOLVED" in Google Chrome
» Fix the "No Internet, Secured" Problem in Windows 10
Feel free to reach out with questions or requests you’d like us to cover.
About the Author