Beginners Guide To Using MS Visio [6 Step by Step]
![Beginners Guide To Using MS Visio [6 Step by Step]](https://api.softwarekeep.com/media/mageplaza/post/b/e/beginner_s_guide_to_using_microsoft_visio-1.png)
Create beautiful flowcharts, wireframes, floor plans, and more with Visio. Learn how to use Microsoft Visio with 6 easy tips and tricks from us.
Let's get started!
Admittedly, first times are always difficult and kind of confusing, especially if you’re new to the Microsoft Office interface. Even if you have used other apps from the same brand and you’re familiar with its look, Visio could still be a little hard to navigate.
But no worries! This beginner’s guide will be your assistant in figuring out the basics in Visio, so you can become fluent in using it in no time. Even if this is your first time using a diagram-creating app, you’re in the right place to get started.
What Exactly Is Microsoft Visio?
Microsoft Visio is a handy tool, designed to help you create versatile diagrams and flowcharts fit for all projects. No matter if you’re a teacher or an engineer, Visio has all the right tools, shapes, and functions to aid you in your projects. It’s easy to design and customize your own diagrams.
With an array of shapes and editing tools, templates, and themes, you got everything you need to get creative and make an outstanding project with a professional look. What we love about Visio is the cost-free icons and assets provided by Microsoft to create industry-standard, beautiful projects.
Microsoft Visio: Essential Beginner’s Guide (Step by Step)
This guide is written for all versions of Visio, including Microsoft 365 and standalone software. Learn how to get started with the app, and master the basic principles you’ll need when working with this Office tool.
Step 1. Get Started
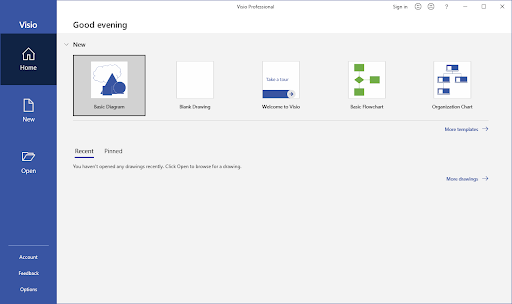
When you open Visio, you’ll be presented with different kinds of templates for different projects. You can set up a Basic Diagram, Basic Flowchart, Organization Chart, Detailed Network, Diagram, Workflow Diagram, Office Layout, Home Plan, and so on. All of those templates include specific tools and stencils related to the particular topic.
So, the first thing you have to do is to figure out if the diagram or flowchart you want to create is related to any of those topics. If it is, then all you have to do to get started is to click on the template. Visio will set up the workspace for you, and all it took was one click of the mouse.
You can even see more pre-built workspaces if you click on the More templates link. Still not satisfied? There are hundreds of free-to-use templates online for you to download and import into Visio. You can even create your own templates to use for future projects.
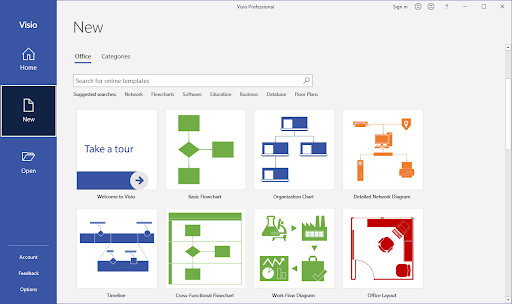
If you don’t see a template that is suitable for your needs, you can choose to start a Blank Drawing. This allows you to build your project from scratch with all different kinds of objects and shapes at your disposal.
Step 2. Set Up the Sheet
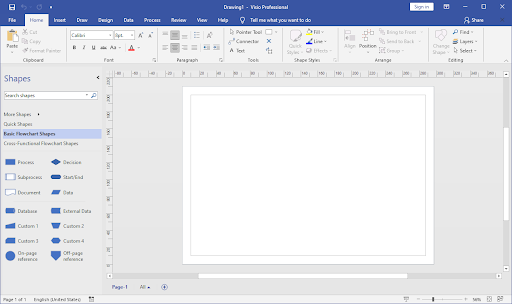
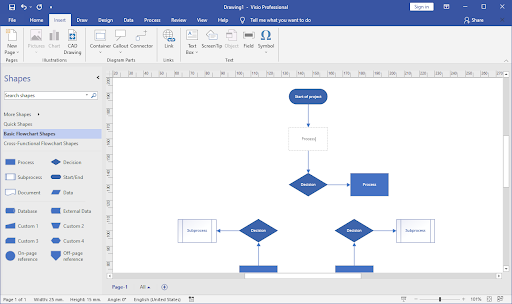
Once you’ve chosen a template to work with, you will see a page with a blank sheet in the middle, a Ribbon menu on the top, and a toolbar with Shapes on the left. This is the basic interface of Visio.
If you want to change the shape or orientation of your sheet, just go to the Design tab, and then click on the Orientation tool that’s located on the Ribbon. Choose whether you want it to be in a portrait or in a landscape mode.
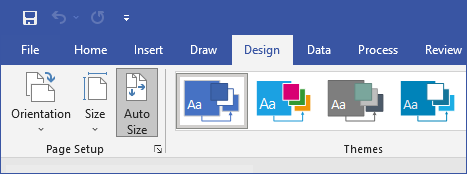
To change the size of the sheet, simply click on the Size tool and choose the size you want. You can also pick from industry-standard resolutions and sizes to ensure your work meets the requirements for your job.
Step 3. Start Drawing
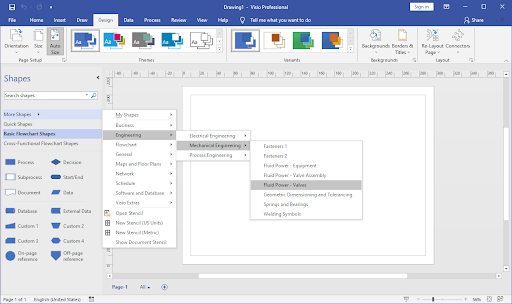
All you need to do to start creating your diagram or flowchart is to click on More shapes from the toolbar on the left and select the category you need. You can choose from the following categories: Business, Engineering, Flowchart, General, Maps and Floor Plans, Network, Schedule, Software, and Database.
Don’t be afraid to explore all the categories to find the perfect shape you need if you don’t find it in your main category! Start by choosing one of the shapes, click on it and then drag it to the blank sheet. You can place it wherever you like, resize it and rotate it.
Step 4. Connect Your Shapes
To connect the shapes you added to your project, click on the Connector tool from the Ribbon. You can typically find this in the Insert tab. With the tool selected, place the connectors wherever you wish.

Depending on the Microsoft Visio version you’re using, the connectors may be under the drop-down menu called Shapes. You can easily adjust them, resize them and link them to different shapes.
Step 5. Add Text
The easiest way to add text into the shapes is to simply double-click on them and start typing. This way, the text you’ve typed becomes a part of the shape, so whenever you move the shape, the text moves with it. Press the Enter key to start a new line within the shape if necessary. To finish typing, just click off the shape.
Another way to add text is to use the Text tool located on the Ribbon. Click and drag on the sheet to create a text area and start typing. You can place the text inside or outside of the shapes and edit and format it with a variety of tools.
Step 6. Save Your Work
After working on your project or finishing it entirely, find the Save as… option in the File menu and save your document.
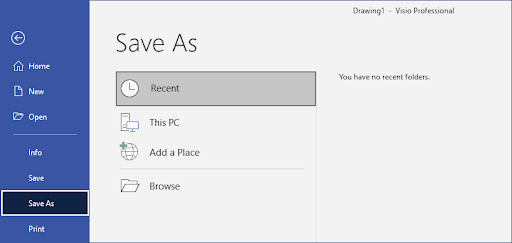
You have the option of saving your file in many different file formats. If you want to be able to open and edit your project later, you need to save it in “.vsdx” format. If you want to save it as a picture, choose either “.jpeg” or “.png”. You can also save it as a “.pdf” file, so it’s easier to upload it on the internet.
When your project is saved, you can share it with other people without any changes in the quality of the file. If you saved it as an editable document, others with the file can also access and make modifications to it, greatly enhancing teamwork.
Final Thoughts
With learning how to use this great app, you no longer have to ask someone else to help you set up a flowchart or a diagram. Being able to create projects yourself, you have complete control over the diagram from the get-go. Just use those steps as guidelines and don’t be afraid to explore all the options Microsoft Visio has to offer.
That wraps up the 6-step beginner guide to Microsoft Visio. We hope you were able to learn some new tips and tricks to use when working on your diagram projects. These steps will provide a great foundation for your Visio skills and ensure you can improve further and further in the future. Good luck!
Our Help Center offers hundreds of guides to assist you if you’re in need of further help. Return to us for more informative articles, or get in touch with our experts for immediate assistance.
One More Thing
Would you like to receive promotions, deals, and discounts to get our products for the best price? Don’t forget to subscribe to our newsletter by entering your email address below! Be the first to receive the latest news in your inbox.
You May Also Like
» What is Microsoft Visio? Everything you Need to Know
» Microsoft Visio: Complete Guide
» Microsoft Visio Version Comparison
» How To Download and Install Microsoft Visio
» Microsoft Visio: Everything you need to Know